Sunday, February 20, 2005

Gutters (photos)

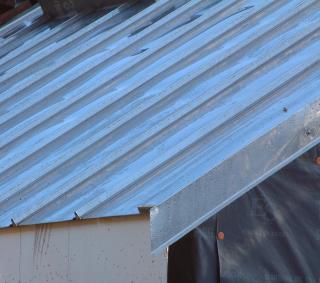
The first section of gutter is up. Like the roof it is stainless steel. I first saw this half-round design with cast clips on youth hostel in California. I've wanted to use it ever since.


The half clips blend well and maintain the clean lines of the rest of the sturcture.


The half-round shape means plenty of fluid capicity with no place for debris to accumulate.
The clips are aluminum and are riveted in place.


Hosed (photo)

The pumps and filters are all installed. This photo doesn't quite capture how spiffy the whole thing looks.


From right to left:

1. Water comes in from a 300 gallon holding tank that catches water off the roof. It is filtered by a 5 micron filter.

2. The water is then pumped back out and uphill to 3000 gallons of storage by a special, low-power Dankoff Slow Pump.

3. Water returns from the tanks and goes through a 1 micron filter.

4. The water is pressurized for household use (ah, I can almost feel the rush of a real shower again), by a very cool Grundfos integrated pump and pressure tank.

5. Finally, the passes through the Trojan UV light to kill anything left in the water. The blue box is the controller for the UV light.


Tuesday, February 15, 2005

Liberation (photo)

I am not a mouse.

Before dawn, before the birds' song, before my first cup of coffee, I arose, donned my long underwear, thermal socks, and cashmere hat and exited my icy shack. Frost covered the windows, and the ground yielded underfoot like chilled cookie dough. As I traversed the 200-yard walk down to my bogged-down tractor, I noted with satisfaction that the standing water had formed into tiny, frozen ponds.

The weather man had been right for a change. Cold and clear. The mercury substitute standing at just above the 20-degree mark. Everything had a light coating of frost; preparing to shimmer the moment the sun crested the low eastern hills.


I climbed aboard and turned the key to the first position. The orange glow plug light came on and I paused for it to extinguish, indicating the machine, Tommy Mow, was ready to start. All was still. A commercial jet, chased by its contrail, made its silent, lumbering way across the sky. I turned the key full to the right and the engine cranked and caught immediately. Like an aging smoker Tommy expelled a few belches of black gunk and then ran smoothly. This time I checked carefully that everything was fully retracted. I grabbed for the seatbelt, but it was frozen to the chassis.

I revved him up to 2500 rpm, and put my foot on the accelerater. Confident, sure-footed and purposeful, Tommy rose up out of his lumber reinforced mud hole, moved forward to a small patch of high ground, obidiently turned to the right, crossed a narrow rivulet and was free. Like a returning comet we swung around the burn pile at the bottom of the garden, and headed home.

The sun rose, the birds sang our praises and everything shimmered.

Sunday, February 13, 2005

Mud Wrestling (photos)

It has been an abnormally dry year. While California and British Columbia got soaked, Oregon remained sunny and warm. But on the east side of my new house a river runs through it.

On Friday afternoon, after the work crew had finished prep work on the porch footings, I decided I needed to really get after digging the new footing drain. Now that the porch footings were located I could see exactly where the new drain line needed to go to avoid them.

I wheeled the tractor into place and started digging with the backhoe. It was mucky, but I was pointed downhill and I figured I could my escape just by coasting down to the bottom of the yard, making a right at the burn pile and I then would be on relatively dry ground again.

After repositioning the tractor several times to dig the 30 foot long trench, I was done. I mounted the drivers seat, reached back to pull on the two levers that retract the hydraulic, stabilizing outrigger arms, turned my head south and started to exit the bog. After 10 feet I came to a stop and began to sink. I looked back, and the outrigger, on the opposite side that I had leaned to, had failed to retract. It had been stuck by the suction power of the clay, and dragged through the mud like an anchor. Whether or not this was the actual cause of my getting stuck, I will never know.


I tried using the bucket to raise the front wheels, I rocked it back and forth, I checked that I was in four-wheel drive. But the tractor just kept sinking, eventually settling at the axles.


Making my own stream

Where my tracks had been, water now flowed freely down and pooled under the tractor. It was getting dark. I decided to abandon the effort that evening. I was gone the next day, but swung into the driveway in the early evening upon my return just to make sure it hadn't sunk any farther. It had not.


Animation: Raising the Deere

Today, I went out to raise the Deere. Using the hydraulic outriggers, the bucket and lots of large lumber I was able to raise it up. My plan now is to wait till Tuesday morning when it is supposed to be below freezing overnight and hope that hardens the ground a little. I have also dug a channel in the mud above the backhoe that is diverting the water around the tractor. I could have a neighbor pull me out with his own tractor, but where's the challenge in that? Plus, instead of the ignomy of getting my tractor stuck in the mud and having to be towed, I will be the guy who managed to get a tractor stuck in the mud up to the driver's seat (all tall tales grow taller) using nothing more than his wits and his Leatherman. Am a man or am I a mouse? We will find out in short order.


Monday, February 07, 2005

Let There Be Light (Photos)

I arrived back home from a trip to town just after noon to find the first, upper story, tall window had been installed. I didn't really want to inquire how. The windows are 3 feet x 6 feet, hefty and delicate. Nonetheless there they were. The first one was in and the opening for the second one, shrouded since September, was uncovered. The interior space came to life with the kind of light and joy that only the sun and the sky can achieve. The rays of the sun sped past the openings and drenched the upper back wall exactly as planned. These valuable photons will be collected during fall, spring and winter by cementitious panels that are designed to radiate the energy back at night and otherwise moderate the temperature fluctuations in the house.

As I stood outside looking up at the windows a bald eagle flew from left to right across the roof. A sign of good fortune.


Front Door.


Front Door.


Ladies and Gentlemen, The Doors! (Photos)

The front and back doors are in. I have a key to the house. Adding some foam around them and sealing the windows make it start to really feel like home.

The doors were made by Mountain View Window and Door of Scappoose, Oregon. I provided the material of 2"-thick, salvaged fir planks from the old shop. The interior doors are also made from salvaged fir, but have panels of solid cedar from the shop exterior. The wood is probably 50-years old. Even so, it's not old-growth. It's simply finished with teak oil.


Front Door.


Back Door

The door hardware is from Emtek and is sandblasted brass. The doors have an easy mass to them. The design is a simple Shaker-inspired pattern of a cross. The doors have numerous pits, bores, channels and from bugs. There are nail holes and the resulting nail stains. There are places that one can see tiny rays of light coming right through the door. They are quite dramatic.

It Leaks, But It's Still Stunning (Photos)

The roof was completed last week under dry weather. Since then Mother Nature has mocked our puny attempts at waterproofing. What is stainless steel and silicone compared to a tortoise shell or the fur of an otter? That's it, a fur roof!


Jordan attaches the final piece of ridge cap.


Finished Roof


The roof leaks like water torture, in maddening, persistent drips, around the vent and chimney penetrations. The four skylights that were "flashed" the old-fashioned way are gloriously dry, and I expect will be so for a hundred years. The other two holes were flashed using the latest, most modern, installed-from-the-top design. The high-temperature silicone for the chimney is spatula-red (apparently this stuff only comes in one color no matter what the use) and has an astounding temperature range of -100 to +450. The ads say, "... lasts for years but installs in minutes." We have concluded that the old ones have to be removed, which means removing part of the chimney, the roof thuroughly cleaned in that spot and a new, square one (different brand) installed.


The rather unusual "turnbuckle" detail that will support the gutter.


View from the east.

Wednesday, February 02, 2005

Red Letter Day

I don't have time to write much about it now, nor time to post pictures, but today two great things happened:
  • The roof is finally complete.
  • The front and back doors are in.
The last piece of the roof was screwed into place this morning. By noon my doors were on. Now I have a key to the new place. The weather continues to be suspiciously dry and clear, making the house seem even more inviting.

Thursday, January 27, 2005

Human Error

The four water tanks arrived last week, but I had to send 3 of them back. They were 1100 gallons instead of the 1000 gallon tanks I'd ordered. Not a big deal except that the two designs are radically different, the former being short and squat and the latter talll and skinny. The shed I'd built for the tanks accommodates only the taller skinner ones.

Another error, from a different vendor, resulted in several metal fittings ordered galvanized being delivered with out the specified coating. In addition 30 custom brackets were the wrong model completely.

I mention both of these because they were both due to human error on the part of the vendor. Errors that could have been avoided if they would allow ordering through their websites. Or at the very least any error would have been my own. This seems important when in both cases any meager margins for the products were consumed and then some by the errors.

In the case of the tanks, it's a bit more understantable that there is no direct ordering as the logistics of shipping are involved, but in the other case it's harder to understand. The company is Simpson StrongTie and though one has to look up the model and download the custom order form from their website, one is forced to go through a dealer to order them. This seems a complete and unnecessary waste.

On the other hand how far will automation take us? Are these really incompetent humans that can do better or at least not representative of most humans or is some level of incompetence a human trait that we should recognize, and if not celebrate, at least abide? If in order to satisfy my desire to never be inconvenienced in the slightest way the human element must be removed is my being invonvenienced really the most important thing?


The Roof is On

I would say that my mood is bouyant. Good things are happening daily, nay hourly. Most importantly the days are getting longer, warmer, and drier. If one were going to build a house in the winter in coastal Oregon, this was the year to do it. But even so December and January were mentally challenging. But now it's just a delight to go down and work on the house.

The roof is on. Today the last roof panel was finally put into place. There is still the ridge cap to put on (not an easy task) and one that it is hoped will remove the last two drips of rain in the house (around the vent and chimney pipe).

I calculate that on or about February 8th the sun will once again strike the roof. I expect that the effect will be blinding. Pictures soon.

The doors are here. Last week we went and picked up all 6 of them. The two exterior doors are oiled up and ready to be installed. Pictures soon.

I've been working on the electrical system, and making terrific progress. 400 feet of metal conduit had to be run in the basement and that is nearly complete. Soon I will actually hook it up to the panels.

I am targeting April for move-in.

Friday, January 07, 2005

Still Two Panels Shy of a Roof

Nothing happened on the house between December 20th and today, January 7. It has been dark, wet and near freezing. The house, not being fully enclosed is not the most pleasant place to work. I will confess to some post-holiday reluctance to getting going again. Having spent the holiday in the warm bossom of my parent's home, with lots of hot water, mounds of food, and nothing really to do, I found my return to my dank, fetid, icy hovel of a temporary residence a bit of a shock.

Turning the heat off overnight has meant the house descending to the 45 degree level by morning. I find it is awfully hard to drag my ass out of bed into such a chill.

But today I sucked it up, went out and wired the bathroom. Still, I only worked until 3:30 today when my toes were frozen and my fingertips numb. The forecast is for the cold snap to end after next week. Even so, the entire winter has been relatively dry.

The pumps, water tanks, and filtration equipment have all been ordered from afar and are en route. The doors will be picked up and the exterior ones installed this month. Deck/porch lumber has been ordered and the deck may be truly started this month as well.

I'm still two panels short of a roof. Some say this is also describes me personally. The chimney and vent still leak, but the roofers are convinced that it is water running down from the still open ridge. So the roof will be sealed up in the next week or so, and if it still leaks, then it will have to be reworked in the summer.

The days are getting mercifully longer and in another 45 days we will start seeing signs of spring. I look forward to it more than I do Christmas.


Friday, December 10, 2004

Two Drops Forward, One Drop Back

The roof is more than 3/4 complete, but it leaks in four places. One is the vent flashing. This should be fixed by installing a new one.


The second one is in the skylight that has been flashed, but the roofing above it has not been installed. Thus all the water from 66 square feet of roof runs right under the flashing. Still, it didn’t leak when it had only "paper" flashing. This should be fixed when the additional roof pieces go on.

Third is in the living room above where the aforementioned roofing is to be installed. Should likewise be fixed. Still, it’s incredible that the roof is leaking at all.

Fourth, and the most disturbing one, is in the living room in an already roofed section. This area has never leaked before. The only source for water has to be the very upper edge of the roof that won’t get capped until the whole thing is on. Let’s hope so. I don’t really want to contemplate the alternatives.

The roof is made up of only 8 giant, 10" thick panels. The seams have been glued, and foamed. Then they were foamed again, once in place, and self-adhesive flashing was laid over all the seams (only 4 seams). Atop all this is a 5/8" layer of plywood that is offset to every seam, and is glued and screwed in place. Over all of this is a layer of Tri-Flex 30 roofing "paper". A tough, hurricane rated, polyethyline roofing material. The curbs for the skylights is equally impressivelly flashed. Still...

Never underestimate the persistence of water.

Friday, December 03, 2004

Schedule 40

I loathe days like today. I spent it driving a hundred miles to make 3 stops. Worse than this, I was under a tight deadline to get to my last stop before they closed at 4:30pm. This was necessitated for wont of a vent pipe. The two feet of 4" vent pipe that will stick up above the roof. Often this is left as the 4" of black ABS, painted or covered by some metal roof jack. In my case this was to be, like everything else, stainless steel.

The Zs had volunteered to come up with a piece through their contacts, but suddenly on Wednesday they realized that they were about to cover that area of the roof, and they had no solution. I was in Astoria all day Thursday, and they agreed to solve the problem that day. When I returned home, I swung into the new driveway in the darkness and directed my headlights onto the roof. Little or no progress and no vent tube.

Thus I found myself this morning having to come up with a piece of pipe. Being Friday it was important to get something that day in case our spate of rain-free weather continued. The gods were dangling the good weather in front of us, and we were blowing it. In these past 3 days the roof could have been virtually finished.

I turned to Northwest Metal Products again. They were as responsive as usual, but if we were going to do something with what was on hand, I would have use "schedule 40" stainless steel pipe. I have seen and used the term often, but like so many things in life that we are familiar with, in truth we have no clue what they mean. In this case schedule 40 is the common minimum standard for DWV pipe, for example.

What I had originally wanted was a very thin piece of tubing as a mere cosmetic cover to the pipe or even to couple to the system via what is called a "hubless" coupler. In either case I had in mind something maybe 1/32 of an inch thick. I learned that pipe is really only specified by its outer dimension. I then made the wrongheaded logical jump to conclude in my own mind that surely schedule 40 4" stainless steel pipe would naturally be much thinner than 4" plastic pipe. This notion is further obscured to the novice because schedule 40 pipe is routinely referred to as "thin wall" pipe in the industry even though ABS DWV pipe is 1/8" thick.

In any case, although a c-note to acquire, I ordered it under a bit of duress, and then fled my house to make my own schedule

Boy was I surprised when North West presented me with a nicely polished hunk of tubing weighing in at a good 20 pounds. Remember, it is only 2 feet long. Turns out that schedule 40 is exactly that, a schedule. It's not a formula or a chart, but a schedule where one must look up the material, and nominal diameter and with this determine what schedule pipe to choose to meet one's other requirements. Turns out I really wanted was schedule 10S or even 5S stainless tubing.

One end of my vent pipe is precisely cut at 30 degrees to match the slope of the roof, and northwest had polished it up quite nicely. It is really too beautiful to mount on the roof, and I'm considering keeping it in the living room as a monument to how even the best intentioned modest projects can turn to folly and excess.


Wednesday, December 01, 2004

Metallica (Photos)

The stainless steel roof is starting to take shape. Today was the first of a few forecast clear days. The Zs got their first skylight sealed up and it is a thing of beauty. Thanks to the custom made stainless "saddle" I had made and some different side flashing there are up to 4 layers of water proofing with no silicon or caulking of any kind. This is waterproofing the old fashioned way, that is not trying to block water with high-tech sealents, but giving the water an easier path to ground. About 1/3 of the roof is complete, but it was too late to take pictures of it so here are some from earlier in the day. Click on the thumbs for larger images.


Workers in the mist


Working from the inside out


This doesn't work when it's raining


Doesn't look different from the south


In Oregon you can't have enough roofs

Tuesday, November 23, 2004

Venting (Photo)

There are many things on this house that I'm doing for the first time. One of these is a complete drain-waste-vent (DWV). The drain-waste part isn't that difficult to understand conceptually. After all, as we all know shit flows downhill. But figuring out how to get the vents back to the main stack so that I didn't have to put another hole in the roof was a challenge.

I called for a preliminary inspection before I glued the whole thing together. Matt was nice enough to come out even though it's not routine to inspect unfinished work. He told me my "wet vent" plan wasn't going to fly even though my piping is all well oversized.

It is one of the advantages of a small house. Using the largest possible piping doesn't cost much when the run is only 7'.

I redid the venting, but I didn't like the result after I glued it up. 4" pipe turns out to be tricky because when it is dry-fit it will often not fully seat in the fitting. Even so, it's really hard to take apart. However, once glued, the unset glue acts like a lubricant letting the parts fully engage. Unfortunately this tight fit means that the dimensions shrink. It's easy to lose a half inch or more once the glue goes in. This caused me no end of problems.

Likewise getting all the angles right. It's not so easy in 3D. Understanding that a 45 degree angle pipe needs another 45 degrees to change direction to 90 degrees isn't hard. But what if that 45 degrees is dropping out of the cieling pointing NNE mating to a pipe running east with a 45 degree bend to the south but canted 45 degrees up? The best answer I found is to buy a whole lot of 22, 45, and 90 degree bends and return the ones you don't use.


My first DWV


The photo shows the completed and entire DWV for the house. The bath was deliberately backed up against the kitchen sink to minimize plumbing and to make the hot water run as short as possible.

I did have to redo the water closet (WC a.k.a. toilet, crapper, shitter, can, head, etc.) and sink portion for the reasons cited above and because I wasn't satisfied that it was an elegant enough solution.

Next hot and cold water.

Thursday, November 18, 2004

Solar Story

Part of the plan for the house is a small solar array (1500 W). You might think, as I did, that with the solar industry over 25 years old, that getting the exact product one wants would be easy. It is not. There are few vendors of small systems (sub 2500W) that will sell power back to the utility (grid-tie) and at the same time offer battery backup. I had placed an order for such a product from Xantrex (yet another Canadian company). The grid-tie part was to ship in August, but August brought only an announcement that they had decided not to make the product after all.

This left Outback Power Systems of Washington with the right products. They are a private and relatively new company. There website is horribly out of date, and they seem like the kind of garage company that could fold any minute.

I held off waiting to see if any new products or mergers would be announced. So yesterday I placed the order for an Outback system. I only need the inverter and some mounting equipment. I have had the solar panels for nearly two years now.


Night Shift

By 6pm it is pitch black outside. Clouds or mist routinely obscure the moon. It is dark, cold and quiet in the house. Through the plumbing that I'm working on I can hear the haunting drips in the septic tank. Like listening to the bowels of a cavern from its entrance. I have set a tarp out to collect rainwater and direct it into the empty tank. Even though the tank is concrete I got conflicting reports as to whether or not it would pop up out of the ground: a boat floating in a sea of mud. To be safe I'm directing water into the 1000 gallon tank.

Now that the house is essentially water tight, I thought I would be working late into the night on various aspects of the interior. This as proven not to be the case. By 7 or 8 pm I am done for the night. 500 watts of light (actually a 65W fluourescent) is just not enough to keep me from wanting to hibernate. By contrast, I could stay up to the wee hours working on this computer. When it comes to physical labor, I am definitely diurnal.


Saturday, November 13, 2004

First Light (Photos)

Seven of the eleven windows are now installed. Along with the four skylights, it makes the interior light and open even on a gray day. This is just as I expected based on my obseration that it's not so dark and gloomy even on a rainy day in Oregon, it's only dark and gloomy inside homes where the windows are small and/or shaded by deep eaves. Once the large clerestory windows go in, it should be even more compelling.


Work on the roof is paused while I have some custom made flashing made up for the skylights. The flashing that we received from the metal roof company was not adequate. These parts might be ready at the end of this week.


The chimney is poking up above the roof line. Soon there may be heat, something I have not experienced in the past two years except in brief visits to other's homes.


I have settled on the tile for the house, having found an exdellent supplier in Portland called Pratt and Larson. Great showroom, nice people, excellent products, and some products that are close to affordable. But tiling is only in my dreams right now.

In the meanwhile, with the number one priority on hold, the subs have begun on the porch. I'm gluing up the drain-waste-vent line into its final tentacular configuration. We have been blessed with dry weather for over two weeks now. This can only mean that when the roof is ready to be applied it will rain cats and dogs for several months.


Sunday, November 07, 2004

A Farmer Is...

A farmer is many things, but often a mechanic. I got the parts for my tractor back. A rebuilt steering valve and one new fuel injector (of three that were cleaned and tested). My compact little tractor is compact in every way including how every aspect of this bulldog of a machine is crammed together. His name is "Tommy," so dubbed by his previous owners, to which I have appended, "Mow".

Early yesterday morning, in the still frigid hour before the mists had lifted and the sun was only a faint hope, I took my bucket of parts and set up a crude table under the roof of the open shed that Tommy Mow calls home. Everything was cold. Stuff that started out warm, like my tools, my hands and my feet, quickly numbed in the water logged air. As my fingers stiffened, getting the small nuts in place proved increasingly a challenge. Nothing is as cold as cold steel.

I managed to snuggle the 3 injectors into their holes, holding back the wiring harness like holding back some large artery during surgery. Once installed, the fuel hoses were clamped back in place.

Next it was on to the steering valve. The name belies its size and especially it's heft. Weighing in at some 20 pounds of delicate hydraulic valve, it is disguised as layers of steel arranged in plates like a Masterlock, yet not bigger than a large cinnamon roll. Protruding from one end is the steering column. And therein lies the challenge of extricating it or placing it back inside the dash. The instuctions call for removing the engine drive shaft to give it room to drop out, but I'd discovered that by removing a couple of dashboard wiring harnesses, and pushing the dash back, I could get it out without the complication of messing with the drive shaft.

I guess there is one other thing to relate. All Deere hydraulic equipment manuals have the picture of a finger being injected by a high-pressure break in the hydraulic line. Accompanying the image is a statement, "Escaping fluid under pressure can penetrate the skin causing serious injury. If an accident occurs, see a doctor immediately. Any fluid injected into the skin must be surgically removed within a few hours or gangrene may result. Doctors unfamiliar with this type of injury may call the Deere & Co. Medical Department in Moline, Illinois." No number is given.

Putting it back proved more challenging than removing it. I had to hold the entire, chilled weight with one arm, push the dash back with the other, and carefully thread the whole mess up through the dashboard. Once in, it sat precariously, suspended only by the threads of four bolts, while I got a nut threaded on. The front two nuts were no problem, but I could hardly get my fingers in to put the back ones on, finally getting the last one to thread by shear luck.

Once securely in place, hooking up the four hydraulic lines to its base was an equal challenge. When disassembling it, two of the compression fittings had turned the tubes they fit around into water slides and plunged down the lines and under the chassis somewhere. I'm a bit slow, so it wasn't until after this happened again that I got the bright idea to put a zip-tie around the line, below the nut so that it could only fall a short way.

I started by retrieving the two lost nuts and securing them with zip-ties. Then one by one I followed the sequence of placing a small o-ring in the downfacing side of the fitting. Then carefully so as not to dislodge the o-ring, I moved the hydraulic line over, and hand threaded the nut.

The quarters were close. In fact, I had purchased a whole set of wrenches to do this work. Truth be told, this is the main benefit of doing your own repairs, buying new tools. Among the new tools was a set of "stubbies." Special, short versions of wrenches for exactly this situation.

It is important to have the right wrenches. There is a lot of sharp, cold steel around. A wrench slipping under pressure could cause a nasty injury.

The four lines hooked up, I put enough screws back in to hold the battery tray and started it up to check for leaks. After a few turns of the motor it came to life. It sounded great, the new injector making a big difference. No leaks in the hydraulics. I raised the bucket without fluid spraying everywhere. I increase the rpm and repeated the motion. Still good. I buttoned up the rest, putting the muffler, air cleaner, and other parts back on and finally buttoning up the side panels.

I proudly rode my rejuvinated tractor down the road to the new house. Far from being a real farmer, but closer anyhow.

Saturday, October 30, 2004

A Roof of One's Own

Today was a mini-milestone of sorts. The roof, which has many layers, gained another one as the final piece of plywood was set in place.

To give the roof its sleek appearance, there is a layer of plywood that covers the SIP roof and extends 2 feet out in every direction. To support this, what would normally be rafter tails were created out of clear cedar, mounted to clear cedar headers and bolted to the side of the house in 8 foot sections. The Zoeller brothers did a marvelous job. It was more like building furniture than the way a house is normally constructed.

The outside sheets of plywood are "good one side" product called Breckenridge and stained to match the cedar. They are the visible part that overhang. Regular 5/8" ply is used on the rest. We came close to running out, and the last row of infill was a patchwork of remaining pieces.

I now feel the roof is quite leak-proof even though it is only protected by a tarp.

What next? Time to cut some holes in it. 4 skylights, a vent and the chimney. I worked on the chimney today. 20' of double-wall stainless steel that sits on a surprisingly small shelf.

After the holes and their various fixtures are installed, then the roof will be papered and finally the metal roof will be installed. Maybe by Thanksgiving... God willin' and the crick don't rise.